Basic tasks
Access
Import
To open a local file, drag and drop it on the platform. Alternatively, go to Sidebar > Browse () > Top Menu and click the Open file () icon or the Import text () icon, which lets you configure the text file before import.
Open in Datagrok
To open a file, table, or other object in Datagrok, open Browse (Sidebar > Browse ()). In the Browse tree, find your object and double-click it to open.
To learn more about data access options, see the Access section of our documentation.
Save and share a table
When you import a table in Datagrok, your changes to it aren't saved automatically. Everything stays in your browser's memory. If you close or refresh the browser tab, any unsaved work will be lost. Click SAVE button on top to upload it to the server. A project containing this table will be automatically created.
Uploading the project object doesn't automatically share it with others. You must share it explicitly.
Saving a dashboard
When you open a CSV file or run a function that produces a table, it opens a Table View resembling Excel. Here, you can edit both the data (the table) and its visual representation (the layout).
Tables and layouts are separate entities. This means you can choose to save changes made to the data, layout, or both.
To save:
- At the top of your screen, click the SAVE button top open the Save project dialog.
- In the dialog:
- For new entities: Enter a name and, optionally, a description for your project. By default, new entities are saved to your personal project under My stuff.
- For existing (modified) entities: Remove any tables you don't want to save. By default, all open tables are included. Select one of the following:
- Save original project: Updates the original project.
- Save a copy: Useful when you want to edit the project, but don't have the privilege to modify the original one. If you choose this option, you must also decide what happens to each table included in your new project:
- Clone: Creates a copy of the table in your new project.
- Link: Creates a read-only linked copy of the original table in your project. Changes to the table in the original project are automatically reflected in the linked table in your project.
- Personal view customizations: Saves personalized layout changes visible to you only, without changing the layout seen by others.
- Optional:
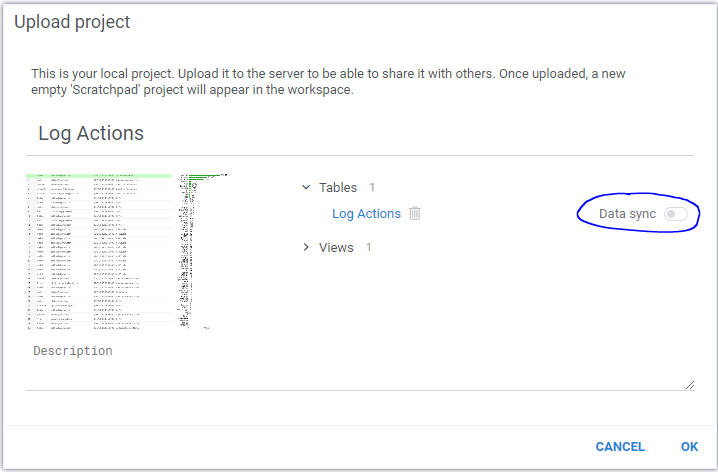
- To update the data every time you open a project, toggle Data sync. This feature is commonly used to create dynamic dashboards or when tables link to different projects.
- To save your project in a presentation mode, toggle Presentation mode. Useful for sharing with data consumers. Toolboxes, status bars, menus, ribbons, context panels will not be shown, letting users focus on the data and visualizations you have created.
- Click OK to save. The SAVE button in the Table View turns grey, indicating you have no unsaved changes.
Moving tables between spaces impacts their hierarchy, name, and privileges. Learn more.
Dynamic data
Whenever a table is generated by a function (such as a database query), this information is stored together with the table as its "creation script". This serves several purposes:
- Provides data lineage
- Lets you refresh data on demand
- Lets you publish dynamic dashboards
When you upload a table with a creation script, you can activate the Data sync option. This saves the table as a creation script instead of a static snapshot. Enabling data sync means that the function behind the table will automatically re-execute each time the project is opened. Additionally, you can refresh the table manually or change the query parameters as needed (Toolbox > Source).
Share
You can share Datagrok entities with other users or groups. When you share an entity, you grant a privilege (View and use or Full access) to others. To learn how to manage groups and privileges, see Access control.
To share an entity, right-click to open the context menu and click "Share...". You can also do that from the Context Panel.
You can send the entity's URL to your colleague. To access an entity via a URL, the recipient needs appropriate permissions.
To share an entity using context actions:
- Right-click to open the context menu and click "Share...".
- In the dialog:
- In the identity/email field, start typing the name, username, email, or group name and select the appropriate match.
- Assign access privileges. You can select any
or all of the following options:
- View and use: Can view, open, and download.
- Full access: Can rename, edit, delete, and share the entity with others.
- Optional. Add a description. Recipients are notified in the app and by email, and the notification includes a link to the shared entity and the description. To skip notifications, clear the Send notifications checkbox.
- Click OK to share.
You can share an entity with an email address that doesn't yet have a Datagrok account. In such cases, Datagrok creates a non-active user account. To access the shared entity, the recipient will need to register and activate their account using the specified email address.
Download
Tables and visualizations
You can download any open table as a file or a set of files. To do this, use the
Download ( ) icon located at the
top of the screen.
) icon located at the
top of the screen.
Supported download formats
- CSV
- Excel documents (.xlsx)
- JSON
- PNG
- PowerPoint presentations (.pptx)
- Parquet
- Feather
- Fasta
- SDF (for tables containing molecules)
When downloading a table in the CSV format, you can configure the CSV file before downloading it. To do this, select the As CSV (options)... command from the Download menu. This opens the Save as CSV dialog, where you can specify the desired configuration. If you want to use these settings by default in the future, click the SET DEFAULT button.
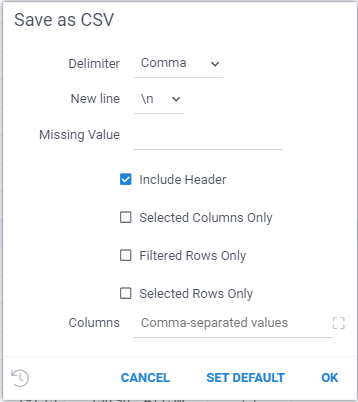
When downloading tables in a CSV format, only the current table is downloaded.
To download all open tables at once, you have two options:
- Create a zip archive with separate CVS files. To do this, select the **CSV and PNG as ZIP commands. This generates a zip file that includes CSV files for each open table, along with "screenshots" that capture the current visual state of all viewers, including the grid.
- Save open tables as individual worksheets in an XLSX file. To do this, select the As Excel Document command. This creates a separate worksheet within the Excel file for each open table.
To download just the screenshots of all viewers and tables, select the As Presentation command. This generates a PowerPoint presentation with individual screenshots that you can resize or delete as needed.
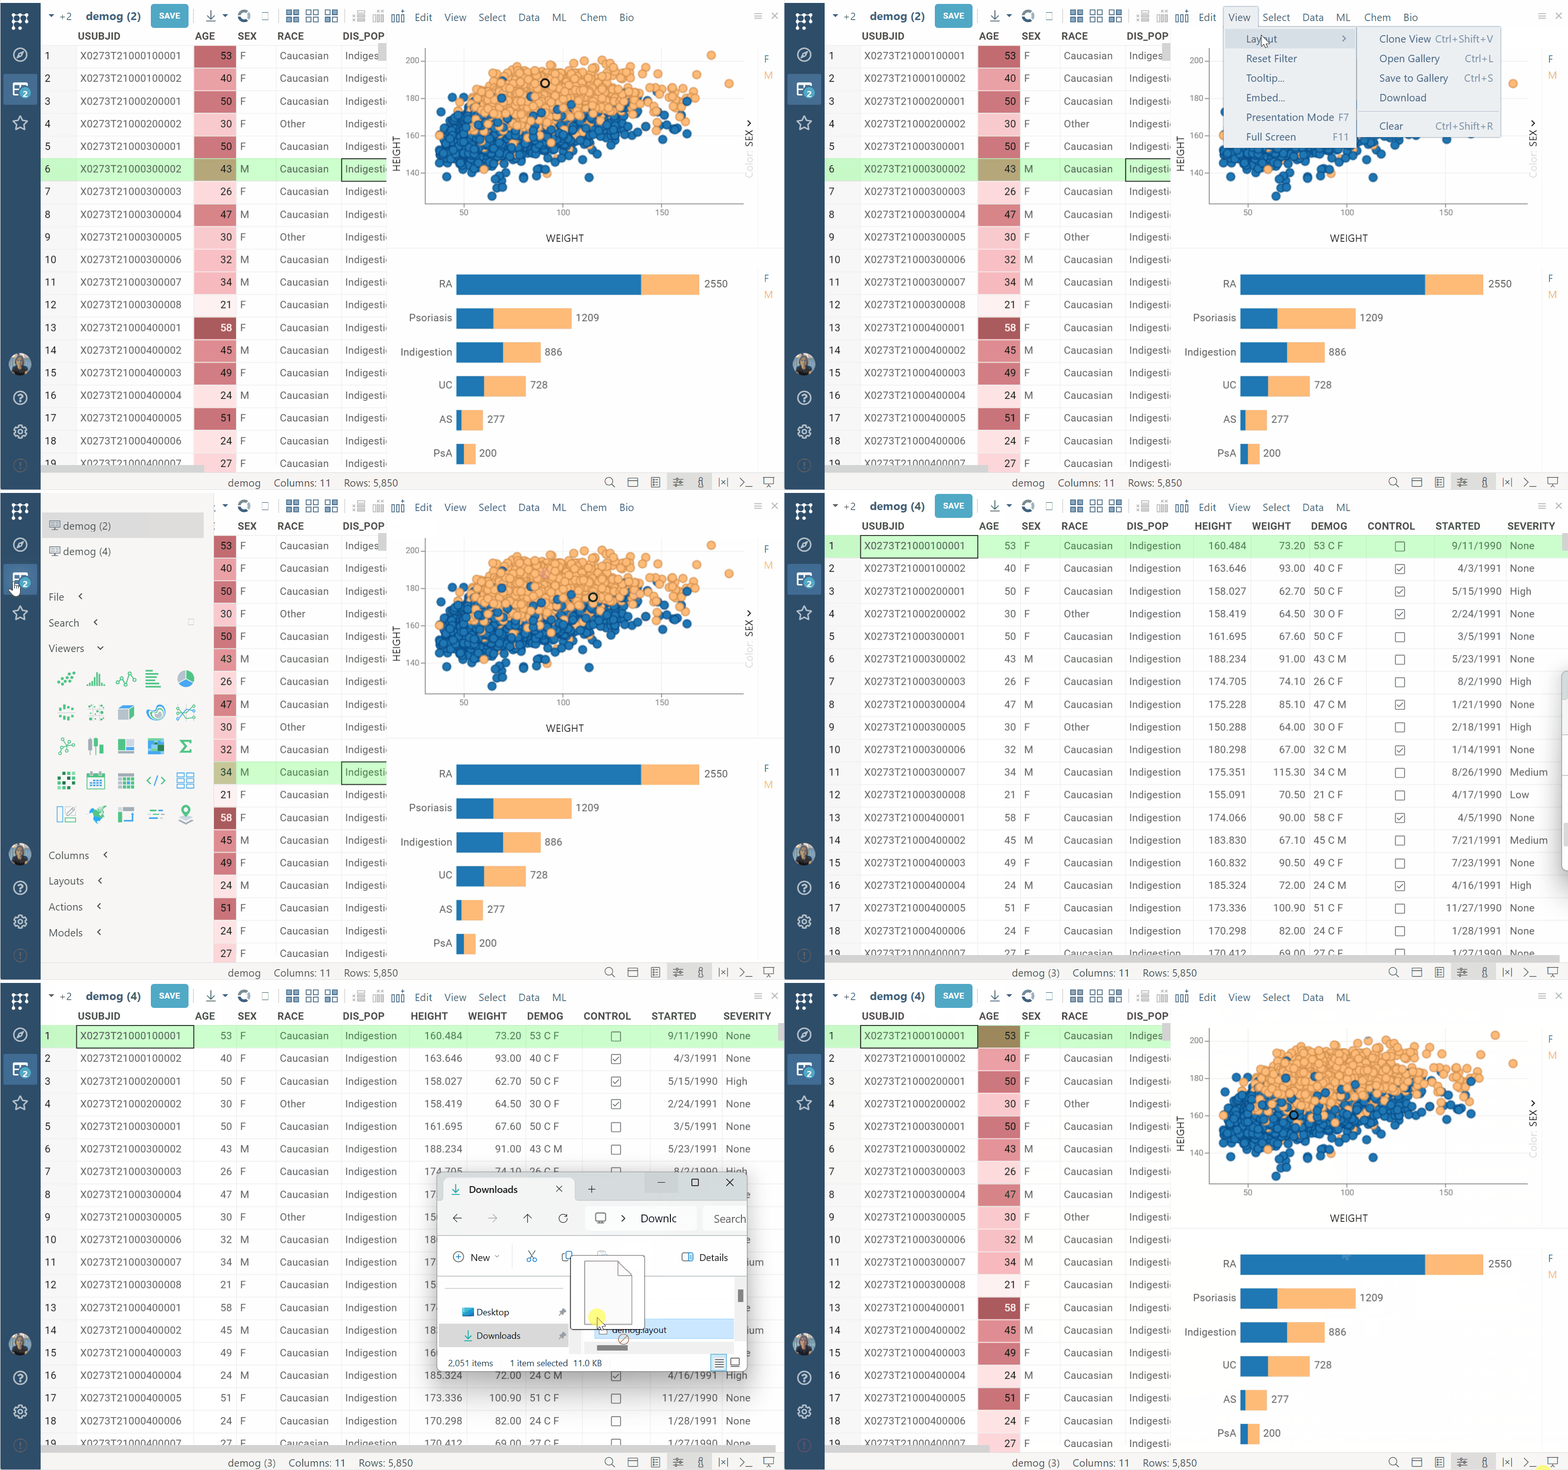
In Datagrok, the underlying data (tables) and their visual representations (layout) are distinct entities. You can download a layout for any open table.
To download a layout, in the Top Menu, select View > Layout > Download for your current table. You can then apply this layout to any other table using drag and drop.
Files
To download a file, go to Sidebar > Browse. In the Browse tree, right-click the file and select the download option from its Context Menu.
Add to favorites
Favorites are shortcuts to the things you use most. They come in two kinds:
- Your own favorites that only you see.
- Group favorites that every member of a group or role sees. Group admins choose them; favorites of the All users group are set by users with the Edit All Users Favorites permission.
What you can favorite
- Any Datagrok entity, such as a data connection, query, script, project, or user.
- Database catalogs, schemas, and tables.
- Files and folders in file shares.
- Data sources, such as Databases > Postgres.
- Any node of the Browse tree, including sections such as Platform > Plugins and grouping nodes such as a connection's Schemas.
You can't favorite a specific value within a cell.
Add or remove a favorite
Do any of the following:
- Context menu. Right-click the object in Browse (or select several objects and right-click the
selection):
- If you don't administer any groups, check Add to favorites. Uncheck it to remove the favorite.
- If you administer groups or roles, Add to favorites is a submenu. Check Only for me to add the object to your own favorites, and check any group to add it to that group's favorites. Unchecking removes it again.
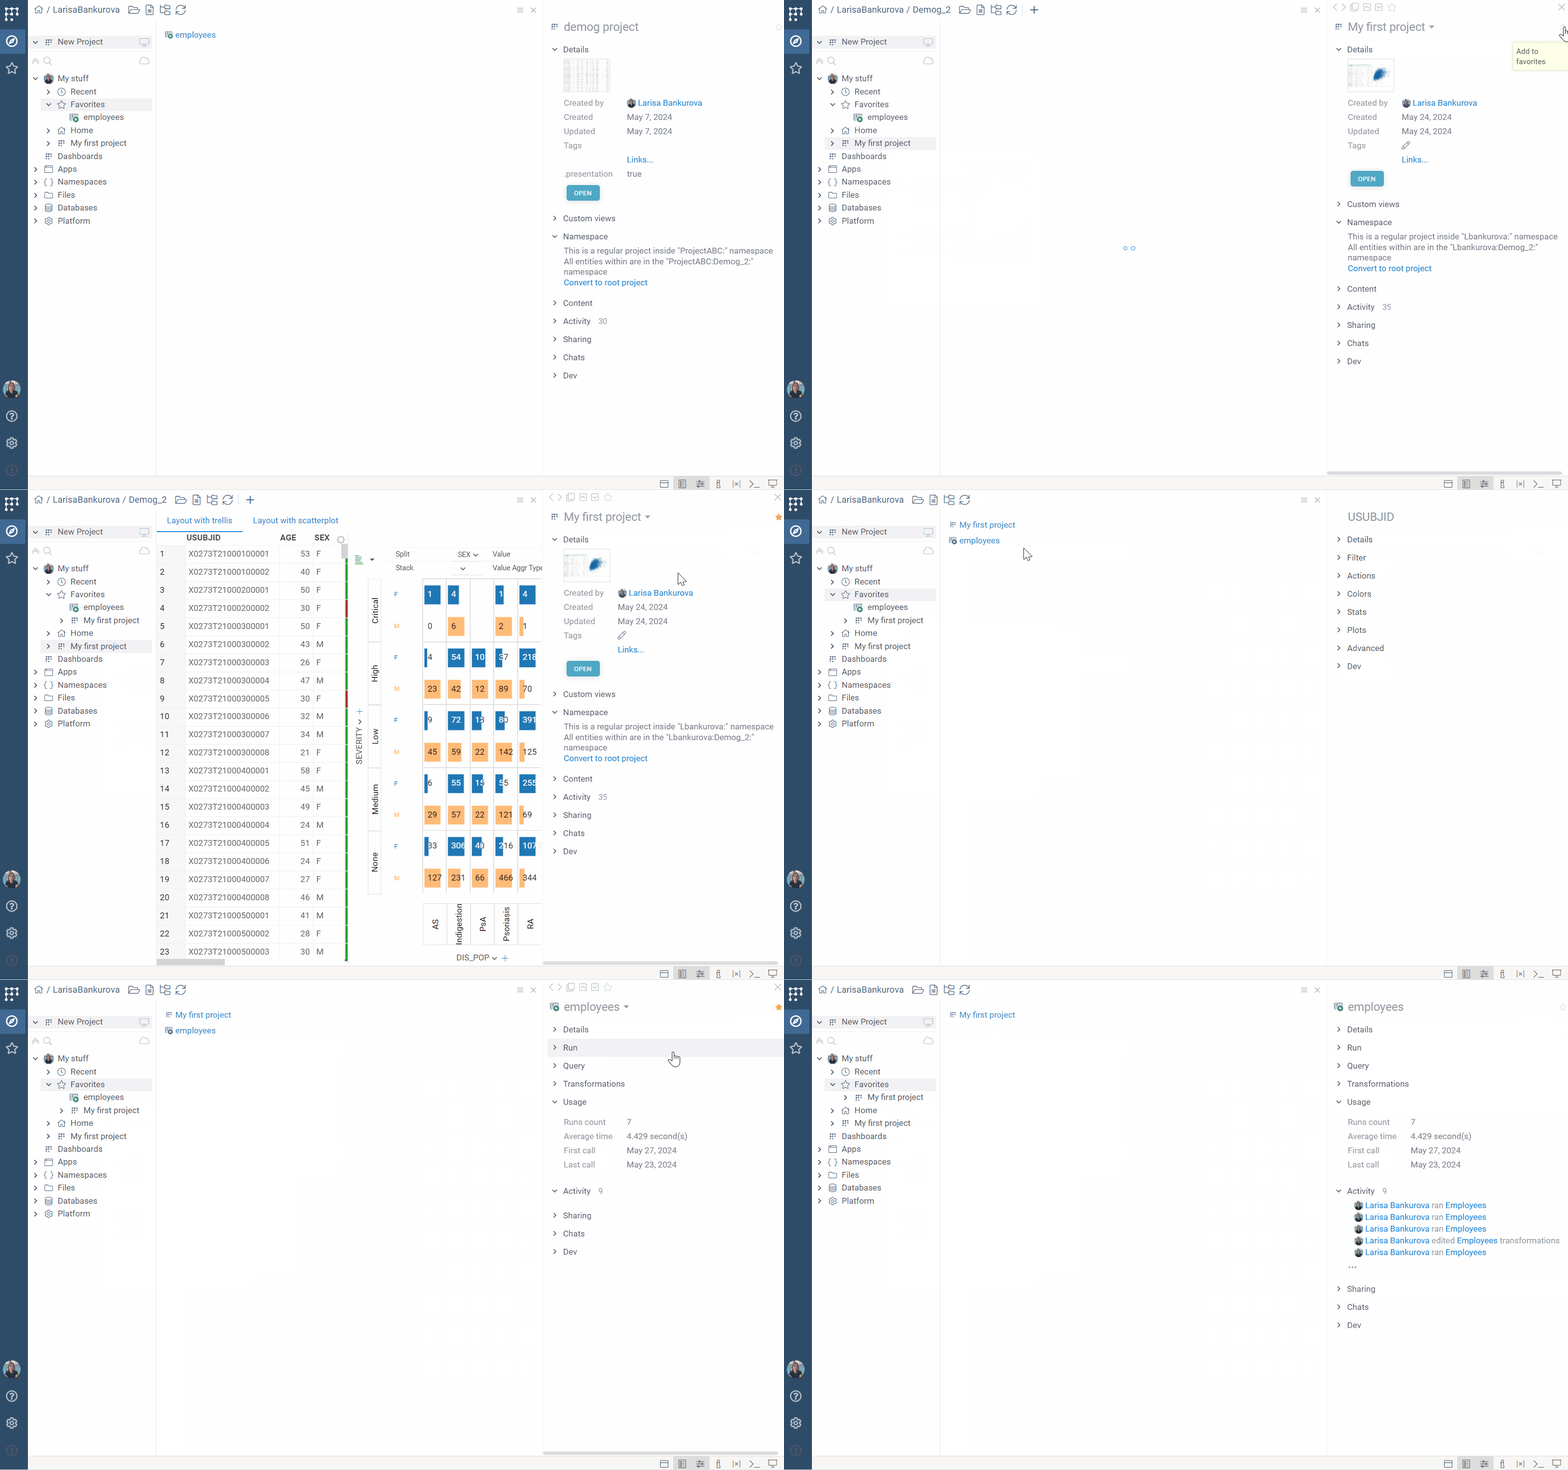
- Context Panel. Click the object, then click the star () on the right of its name. Clicking the star adds or removes your own favorite. To add the object to a group's favorites, click the arrow next to the star and check the group. The star is filled when the object is a favorite of yours or of any of your groups.
- Drag and drop. Drag the object to the Favorites panel, or to My stuff > Favorites in Browse.
Find your favorites
- Browse tree. Favorites are marked with a star in front of their icon and are moved to the top of their folder. Only the favorite itself moves up: a folder that merely contains a favorite stays in place.
- Favorites panel. Click the Favorites () icon on the Sidebar. The panel lists your own favorites together with the favorites of all your groups. Each favorite expands as it does in Browse: a connection shows its queries and schemas, a schema its tables, a folder its files, a data source its connections. Clicking a favorite Browse node opens that node in Browse.
- My stuff > Favorites in Browse, and the Favorites icon on top of the Context Panel.
Who sees what
- A group favorite is visible to every member of the group.
- A favorite database object, file, or folder is visible only to users who can access its connection. If access to the connection is revoked, the favorite disappears for that user.
When a file or folder is moved, renamed, or deleted in Datagrok, or its connection is deleted, its favorites are removed.